
If you're stuck in that loop, maintenance performed, faults unchanged, these eight problems will probably match what you see on your line. You'll walk away with three things: a symptom-to-missing-task lookup table, a method for sizing wear part replacement to your actual duty cycle, and a daily check sheet structure operators will actually fill in.
At a 500 g fill, ±0.5% is ±2.5 g, about a teaspoon of salt. Whether that line holds is something the shop floor always knows. Start with the table.
Symptom → Most Likely Missing Maintenance Task → Immediate Action
| Symptom | Most likely missing task | Immediate action |
|---|---|---|
| Fill volume swings high and low (in-line or rotary) | Calibration + load-cell cleaning | Zero-load calibration with certified weights, then inspect the sensor face |
| Nozzle dripping or product creep | Seal and valve core inspection | Check seal wear depth and material compatibility |
| Cylinder sluggish or weak (pneumatic piston types) | Air line draining + lubricator refill | 5-minute pressure-hold test; investigate leaks if the drop exceeds 0.05 MPa |
| Abnormal noise, unstable cycle time | Rail and drive lubrication | Stop the machine and check drive clearance with feeler gauges |
| Bottle positioning drifting repeatedly | Photoelectric/proximity sensor cleaning | Wipe the sensing face; check that brackets are tight |
| Frequent e-stops or false alarms | Terminal tightening + grounding check | Measure grounding resistance; tighten terminal blocks |
1. The Work Gets Done, but Nothing Is Recorded
What it looks like: in a fault review, nobody can say when the filling head seal was last replaced — or whose part was used.
Logbooks never get built for three reasons: too many fields for operators to complete, paper sheets nobody consolidates, and entries that read "serviced" with no comparable value behind them.
Minimum 8-Field Maintenance Log Structure
| Field | Requirement | Counter-example |
|---|---|---|
| Date / shift | Recorded to the shift | Month only |
| Equipment ID | Matches the asset register | "Machine 1" nickname |
| Component serviced | Component level ("seal, filling head #2") | "Whole machine" |
| Action type | Inspect / clean / lubricate / replace | "Maintenance" |
| Measured value | Actual reading (e.g. clearance 0.25 mm) | "OK" |
| Part number and source | OEM or local + part code | Blank |
| Technician signature | Personal signature | Signed on behalf of someone |
| Abnormality and disposition | Any fault must be routed somewhere | Blank |
Case: at a condiment plant, the same filling head leaked for three months. The technician replaced the seal four times; the leak returned every time. Once a logbook existed, the review surfaced a note from the very first teardown — "valve seat sealing face scored" — buried in a stack of paper. The root cause was a damaged valve seat, not the seal. Replacing the seat ended the leak; all four seal changes had been wasted work.
What you can report upward: an 8-field electronic logbook costs less than 2 hours of labor a month. In this one case it would have prevented about four ineffective replacements and the downtime that came with them.
2. Replacement Intervals Copied from Other Plants
Search the topic and you'll find four answers for filling nozzle seal life: 1–3 months, 3 months, 3–6 months, 6–12 months. Nobody is wrong — the duty cycles differ. The real interval is driven by three variables: product corrosiveness (acidic, alcoholic, solvent-based), temperature (hot product accelerates rubber aging), and shift pattern (two-shift operation accumulates more than twice the actuations of a single shift).
Wear-Part Interval Baseline (8 High-Frequency Parts)
| Part | Reference interval, normal duty | Harsh duty (corrosive / hot / three shifts) | Replace when: 3 signals |
|---|---|---|---|
| Nozzle seal | 1–3 months (aqueous product, single shift) | Inspect every 2–4 weeks; replace on swelling | Swelling, hardening, dripping |
| Valve core / seat | 3–6 months (atmospheric liquid filler) | Inspect every 1–2 months | Scored sealing face, incomplete shut-off |
| Piston seal | 2–4 months (piston fillers) | Inspect every 4–6 weeks | Rising stroke hysteresis, per-cylinder deviation out of tolerance |
| Timing belt | 6–12 months (in-line machines) | 3–6 months | Over 10 mm deflection under thumb pressure, cracked teeth |
| Linear rail block | Lubricate weekly; 12+ months service life | Weekly lubrication + monthly clearance check | Noise, binding |
| Pump bearing | Inspect every 6 months (continuous operation) | Every 3 months | Abnormal temperature rise, increased vibration |
| Filter element | Monthly (mandatory for particulate products) | Weekly | Rising differential pressure, falling flow |
| Solenoid valve | 5 million cycles or response delay above 0.1 s (general pneumatic criterion) | Half the above on high-cycle machines | Delay out of spec, sticking |
The first habit to retire is memorizing replacement dates. A date only tells you when to look; the signal tells you when to replace. Fixed inspection intervals plus condition-based replacement is the method that actually holds up — and it goes in place in three steps.
Step 1 Rewrite "replacement intervals" as "inspection intervals"
Start from the normal-duty baseline in Table 3 and correct it against the three variables: each harsh factor that applies — corrosive product, high temperature, multi-shift operation — cuts the inspection interval in half; two or more factors, go straight to the harsh-duty column. Enter the resulting dates into the equipment calendar or check sheet system. When a date arrives, you inspect — you don't automatically replace.
Worked example: nozzle seal, baseline 1–3 months on aqueous product, single shift. Switch to sugary acidic juice, hot filling, two shifts, all three harsh factors apply, and the inspection interval moves from "look monthly" to "look weekly," with expected life down to the 3–4 week range. Whether to replace is still decided by the signal, never by the calendar.
Step 2 At every inspection, answer three questions
Look: swelling, hardening, cracking, or crumbling on the surface; scoring on the sealing face.
Measure: capture a number wherever one exists — seal compression set, fitting clearance (feeler gauges), timing belt deflection under thumb pressure. Write it into the logbook and compare it against the last reading, not against a feeling.
Decide: against the signal list in Table 3. Signal hit — replace this shift, don't wait for the next date. No signal but the number trending worse — halve the next inspection interval. Number stable — keep the current interval.
Write these three questions into the check sheet so two people inspecting the same part reach the same conclusion — which is also what makes the check sheet in Problem 7 executable on the floor.
Step 3 After replacement, verify before returning to production
Swapping the part isn't the finish line; the fix counts once verification passes. Three things: weigh 5–10 consecutive first articles, all inside tolerance (per the machine's accuracy class); record part, batch, and verification result in the logbook to build a real service-life history for that spare; run one complete batch with no dripping and no alarms before closing out. If verification fails, the root cause wasn't the part you replaced — go back to Table 1 and work the symptom again. More often than not the hidden culprit is wear on something that never made the wear-parts list, such as a valve seat or metering screw.
Case: on a powder filling line running 50 g portions, error crept from ±0.3 g to ±1.2 g, and parameter adjustments did nothing. Teardown showed the metering screw flight worn to nearly 0.4 mm. Abrasive product plus two-shift operation pushed wear far beyond the handbook's default expectation. A new screw brought accuracy back inside tolerance. The pattern repeats: check mechanical wear before touching parameters.
Full per-part lists and tighter criteria are compiled in our Wear-Part Interval Chart — free to download at the end of this article.
What you can report upward: switching from date-based to signal-based replacement aligns intervals with real duty. It removes both the periodic surprise stop and the cost of premature replacement.
3. Washing Only the Filling Head, Missing the Whole Product Path
The filling head is the last link in the product path. Residue actually hides in four places: tank walls and agitator dead zones, inside pipe elbows, valve body cavities, and filter screens. Washing only the filling head is like wiping the door handle and calling the room clean.
Image placeholderProduct path and high-residue-risk points — draw the flow tank → pump → piping → filter → valve body → filling head → bottle, marking the four risk points in red.
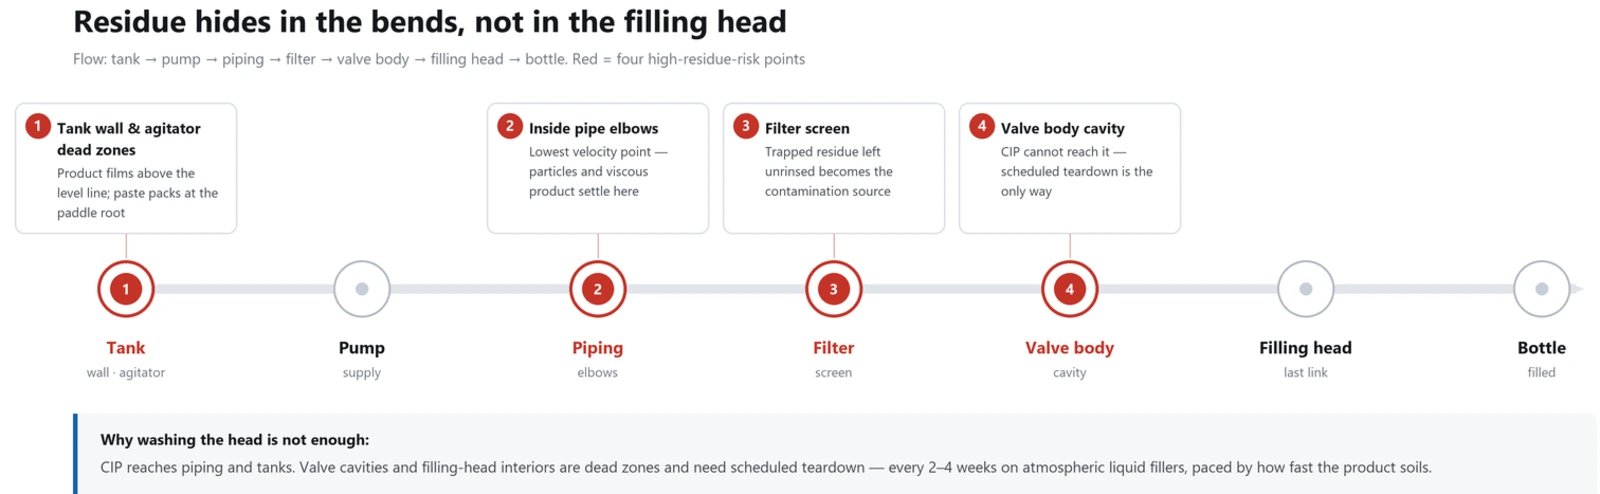
Cleaning strategy follows the product: aqueous products need a water circulation flush every shift; high-viscosity products (sauces, oils) need a hot wash followed by alkaline cleaning; particulate products require removing and hand-washing the filter; crystallizing products must be hot-flushed and drained before shutdown, or crystal blocks will seize the valve body.
CIP (Clean-in-Place) is not a cure-all. It suits piping and tanks; dead zones such as valve cavities and filling head interiors still need periodic teardown cleaning. On atmospheric liquid fillers, inspect valve cavities every 2–4 weeks, paced by how fast the product soils. One more caution: the wrong cleaning agent accelerates corrosion. Chlorinated agents carry intergranular corrosion risk on stainless welds, and strong alkalis are off-limits for aluminum parts. All product-contact components must comply with GB 4806, the national standard for food-contact materials; cleaning procedures must satisfy GB 14881, the general hygiene regulation for food production.
If cleanable design matters at the selection stage, see our liquid filling machine product page.
Copy this into your weekly report: starting this week, teardown cleaning expands from the filling head to the four hiding places — tank, elbows, valve cavity, filter — as a scheduled routine item.
4. Three Lubrication Mistakes — Wrong Oil, Too Much, Missed Points
Mistake one: industrial grease on a food line. Any point that may contact product — filling head guide posts, chain plate bearings — must use a lubricant conforming to the hygienic requirements for lubricants with incidental product contact (GB/T 23820-2009, identical to ISO 21469). A trace of industrial grease reaching the product is a compliance incident. At an SC production license audit, inspectors typically verify three things: the oil's food-grade certification, the lubrication log, and segregated storage. Miss any one and you can be written up as non-conforming.
Mistake two: more lubricant is better. Excess grease is a dust magnet. Rails caked with thick grease in a powder room work like sandpaper. Apply small amounts often, at the frequency in Table 4.
Mistake three: greasing gears and chains but forgetting rails and cylinders. Starved cylinders present subtly: slower cycle times, drifting fill volumes — eventually misdiagnosed as a parameter problem.
Lubrication Point × Grease Type × Frequency × Common Error
| Point | Lubricant | Frequency | Common error |
|---|---|---|---|
| Gearbox | Industrial gear oil | Change every 3–6 months (aqueous plant) | Grease substituted for oil |
| Drive chain | Food-grade chain oil on food lines | Weekly | Running dry |
| Linear rail | Food-grade lithium grease, thin film | Weekly | Thick coating attracts dust |
| Cylinder / lubricator | Per lubricator drop rate (1–2 drops per minute typical) | Check every shift | Lubricator never checked |
| Bearing housing | Food-grade grease | Monthly top-up | Filled until it overflows |
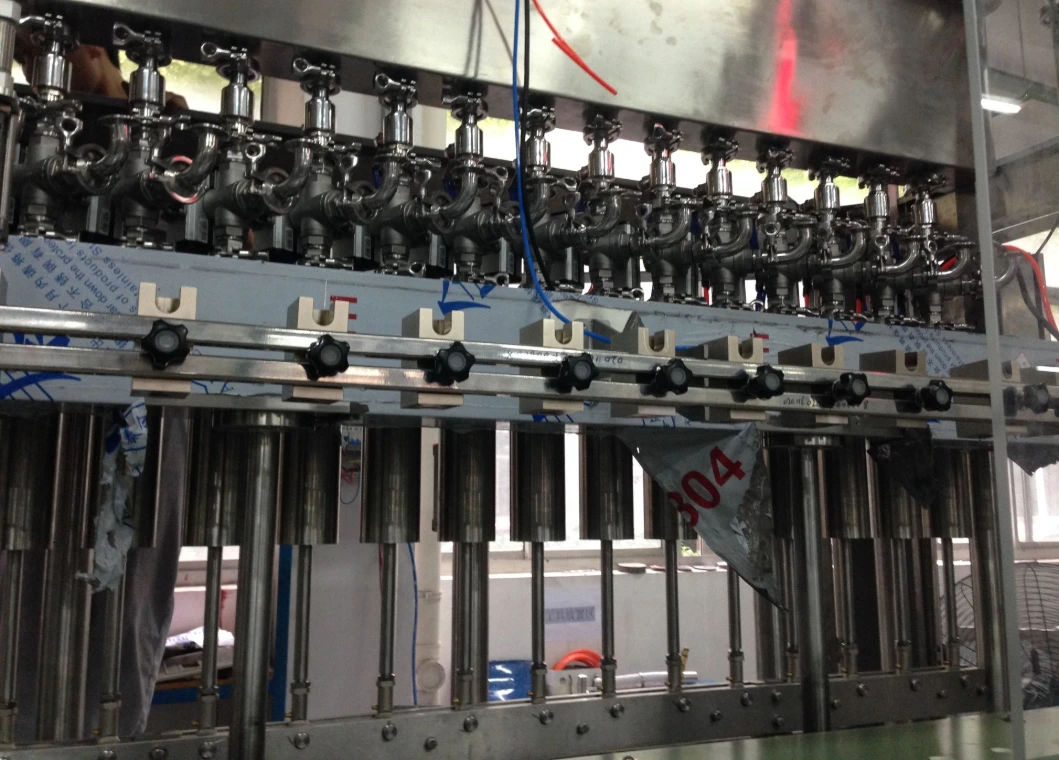
Case: on a solvent-based product line, maintenance used NBR seals as universal spares. In a ketone-containing product they swelled and failed within a week, leaking continuously. Consulting the rubber chemical resistance chart (NBR / FKM / PTFE / silicone) and switching to FKM restored normal service life. The same size is not the same material — verify product compatibility before substituting.
What you can report upward: lubrication and seal material corrections are one-off, low-cost fixes that remove a compliance risk and two high-frequency failure modes at once. Nothing else on this list returns more per unit of spend.
5. Electrical and Safety Checks Dismissed as "the Electrician's Job"
Three electrical items belong in the operator's daily round.
Grounding and static: when filling alcohol, flavor concentrates, or other flammable solvents, grounding resistance must stay below 4 Ω (industry safety requirement for flammable solvent filling), verified monthly with a resistance tester. Static accumulation is the biggest hidden risk on a solvent line.
Three electrical items must never be handled in-house. GB/T 5226.1-2019, the electrical safety standard for machinery, sets out systematic requirements worth checking against on site:
- Main circuit and VFD internal wiring — licensed electrician only;
- Modification of safety interlocks and e-stop circuits — OEM or authorized engineer only;
- PLC (programmable logic controller) program and safety parameter changes — written OEM confirmation required.
Sensor cleaning: dust or product mist on photoelectric, load-cell, or proximity sensors is the cheapest cause of fill drift and positioning failure. A lint-free wipe across the sensing face each shift is all it takes.
Never bypass a safety interlock: jumpering a door switch to hit a shipment deadline removes the e-stop function — and a defeated interlock also masks the true cycle time of a mechanical fault.
Back up PLC parameters: after every parameter change, take a backup. One backup saves three days — without one, recovering from a controller failure adds 2–3 shifts on average.
When asking management for budget, use this line: monthly grounding checks, per-shift sensor wiping, and a PLC backup after every parameter change are all free or near-free. Written into the check sheet, they cover most common electrical fault sources.
6. Spare Parts Inventory Out of Balance
Case: a timing belt failed at a beverage contract manufacturer. The OEM import lead time was 45 days, and three days of downtime cost scheduled orders — worth far more than the belt itself (mid-size line, peak season). Spare parts inventory isn't about stocking more; it's about tiering by failure frequency × procurement lead time.
Spare Parts ABC Classification and Suggested Stock
| Class | Typical parts | Suggested stock | Basis |
|---|---|---|---|
| A (always stocked) | Nozzle seals, piston seals, O-rings | 5–10 seals, about 10 common nozzle sizes | High failure frequency × low unit price |
| B (moderate) | Solenoid valves, proximity/photoelectric sensors, timing belts | 2–4 sensors, 1–2 belt sets | Medium frequency × 2–4 week lead time |
| C (not stocked) | Motors, PLC modules, servos | Zero; emergency procurement on failure | Low frequency × high price × OEM support available |
Local, OEM, or generic parts? Class A can use qualified local parts to cut cost; Class B should stay OEM; Class C parts you use less than once a year aren't worth agonizing over. From a purchasing standpoint, wear parts typically run a few percent of equipment value per year, while a single stock-out stop costs far more — which is why the filling machine wear parts and spares page recommends stocking Classes A and B as a package.
What you can report upward: after re-tiering to ABC, one moderate spare-parts package usually costs less than a single three-day wait for a part — and it compresses that wait to under four hours.
7. Check Sheets Designed to Be Ignored
Among common daily maintenance problems on filling machines, "the check sheet nobody fills in" ranks near the top. Why do most sheets become one-time documents? Too many items, vague criteria, no signature, no routing for exceptions. A sheet that takes more than three minutes gets filled with "no abnormality" by week two.
Four principles for a sheet that works: judgeable within 30 seconds per item; record exceptions only; signed by the operator; exceptions routed to someone.
Per-Shift Check Sheet Template (ready to use)
| No. | Check item | Criterion (30-second judgment) | Result | Exception handling |
|---|---|---|---|---|
| 1 | Nozzle dripping | No visible product creep | ☐ OK ☐ NG | |
| 2 | Air supply pressure | Within 0.4–0.8 MPa (pneumatic machines) | ☐ OK ☐ NG | |
| 3 | Sensor sensing face | No visible dust build-up | ☐ OK ☐ NG | |
| 4 | Rail/chain lubrication | Visible oil film, no dry-running noise | ☐ OK ☐ NG | |
| 5 | First-article fill volume | Within ±0.5%–±1.5% tolerance (per accuracy class) | ☐ OK ☐ NG | |
| 6 | E-stop button | Press once; functions and resets | ☐ OK ☐ NG |
Operator signature: ________________ Shift: ________ Date: ____________
From a check-sheet perspective, the automatic alarms on fully automatic machines can replace 1–3 manual items — worth adding to your selection comparison. See the automatic filling machine product page.
What you can report upward: a six-item sheet that takes two minutes turns execution from a wall poster into a shop-floor habit. Every maintenance system stands on it.
8. Maintenance Windows Squeezed Out by Production Pressure
The conflict between maintenance and scheduling is not a lack of time — it's that maintenance windows are never planned ahead the way orders are. Schedule maintenance against the production beat and the conflict largely disappears.
Maintenance Windows Aligned to the Production Beat
| Window | Suitable work | Time |
|---|---|---|
| Batch or product changeover | Aqueous line pipe flush, filling head cleaning | 15–30 min (product dependent) |
| Shift handover | Six-item check sheet (Table 6) | 2–5 min |
| Weekly fixed half-day | Lubrication, air pressure-hold test, sensor cleaning | 1–2 h |
| Weekend / shutdown period | Valve cavity teardown, calibration, PLC backup | Half day |
When must you stop and call for service rather than push through? Any one of these eight:
- Noise accompanied by metallic impact;
- Burning smell or smoke inside the electrical cabinet;
- Safety interlock failure (a jumpered door switch that still won't start the machine is normal; one that starts it is the abnormality);
- Fill deviation persistently out of tolerance and calibration has no effect;
- Product leaking into electrical or pneumatic components;
- A sudden run of out-of-spec bottles;
- Broken or seized drive components;
- Repeated e-stops with no identified cause.
The boundary between what you can handle and what requires a service call is in the decision tree below; a fuller troubleshooting path is in our filling machine troubleshooting guide.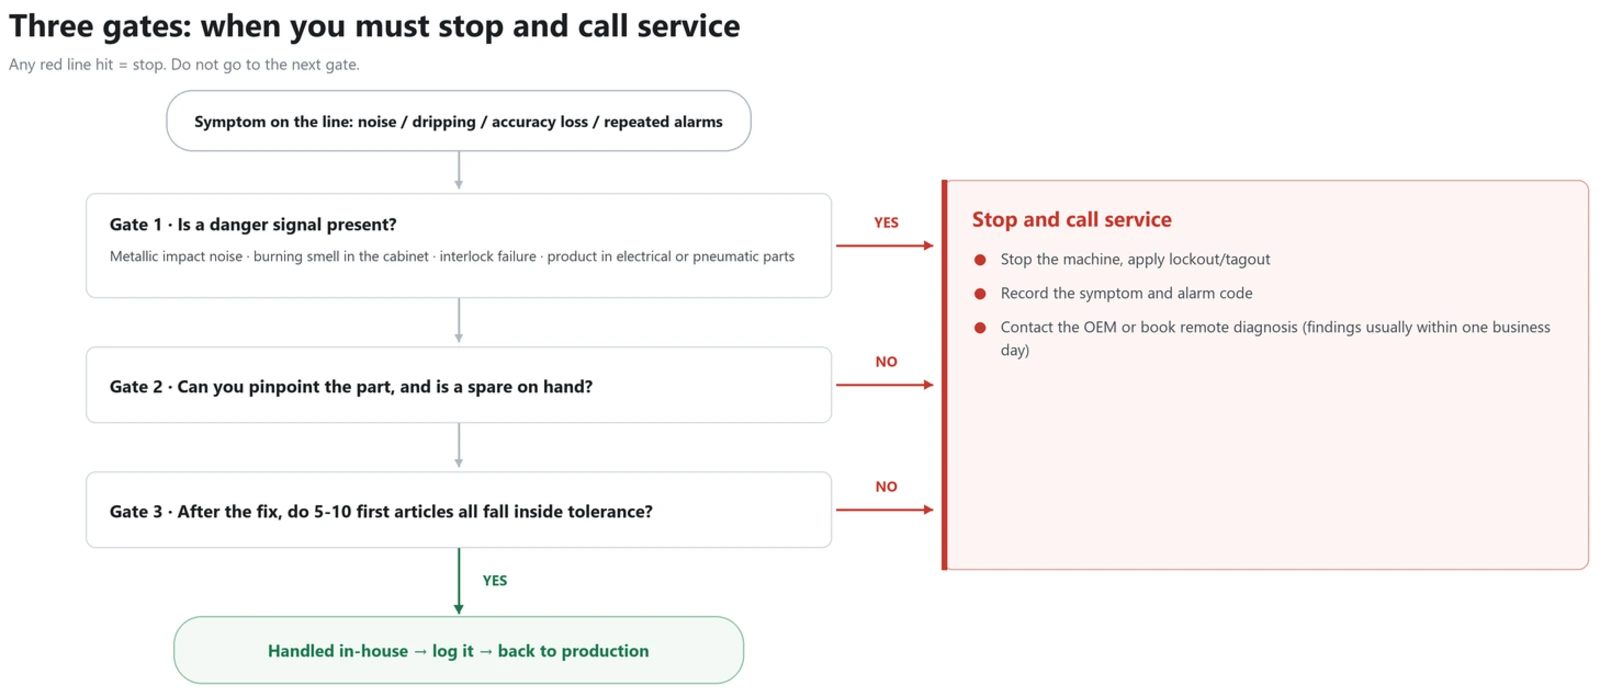
If you're unsure, book engineer on-site service or remote diagnosis — a remote session usually returns findings within one business day.
What you can report upward: once maintenance windows are written into the schedule, most plants complete all periodic work without adding shifts — and failure rates during peak season actually fall.
Frequently Asked Questions
There's no fixed answer. With aqueous products on a single shift, 1–3 months is common; corrosive or hot products on multiple shifts may demand replacement every 2–4 weeks. Run a fixed weekly inspection and replace on condition — any swelling, hardening, or dripping, and the seal comes out.
A general rhythm: checks every shift (2–5 min), lubrication and air checks weekly (1–2 h), wear-part inspection monthly, calibration and valve teardown quarterly. Adjust for machine type and product. The full tiered framework is in "The Complete Guide to Filling Machine Maintenance" (linked here once the guide is live).
In order: zero-load calibration with certified weights to rule out parameters, then supply pressure and level, then seal and valve core integrity, and finally metering components such as screws and pistons. Calibrate first, then mechanical, then parameters. (A detailed calibration walkthrough will be published separately and linked here.)
Not as a blanket rule. Points that may contact product — filling head guide posts, chain plate bearings — require food-grade lubricant; enclosed gearboxes that never touch product can use industrial oil. One criterion decides it: could a trace leak reach the product at this point?
Cleaning and lubrication require lockout/tagout; pneumatic work requires depressurizing first. Only online checks (listening, visual inspection, first-article weighing) can run with the machine live — and never with hands near moving parts or inside the cabinet.
Drain the product and flush piping and filling heads, coat seals with food-grade protective grease, and power up monthly to dehumidify. Before restart, complete a full calibration and leak test.
You're most likely working in the wrong direction: cleaning only the filling head and missing the four hiding places, over-lubricating so dust adheres, seal material incompatible with the product, or no logbook — so root causes get misjudged repeatedly. Work Table 1 backwards to find the gap.